Commodore4ever Wifi Modem Commodore 64/128/Vic-20/Plus 4 For Sale

When you click on links to various merchants on this site and make a purchase, this can result in this site earning a commission. Affiliate programs and affiliations include, but are not limited to, the eBay Partner Network.

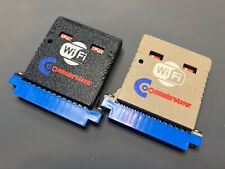
Commodore4ever Wifi Modem Commodore 64/128/Vic-20/Plus 4:
$41.98
Commodore4Ever Wifi Modem
Allows you to connect to your favorite Commodore BBSs via telnet. Supports speeds from 300 to 9600 baud. For use with Commodore 64 up to 9600 baud, a Commodore128 up to 2400 baud, Vic-20 up to 1200 baud, and also a Plus 4 - I have no personal experience with this one.
This new design features switches to enable and disable 9600 baud to make using with your 128 simple and easy! Also has a switch on the right to allow modem to be powered from and external USB source, like the ATOM with USB. If you want to power from a USB then the switch on the right needs to be in the ON position. In the OFF position the modem is getting power from the Commodore. Powering from USB willeliminateany chance of interference as some have experienced, especially with the Reloaded MK2 you are using this modem with a 128 and 1581 or 1571 then you will need to turn off the 9600baud switch on the modem (left switch). Then you will need to skip the below steps for setting up 9600 baud. Instead you will leave the modem type at userport and set the baud rate to 2400. If you are NOT using a 128 with a 1581 or 1571 then you will be able to use 9600 baud.
• Plug the modem into your Commodore user port with the chip side up and then power up your Commodore. If you do not see a solid blue light on the modem then it is not getting any power and you will need to trouble shoot your Commodore. I suggest cleaning the contacts of the userport first.
• If using a commodore 64 or 128 is 64 mode, Load CCGMS 2017. If you are using a 128 in 128 mode Load a term program of your choosing and follow the setup instructions according to the program you use. (I am assuming you know how to load a program from media such as a floppy disk or SD Card)
• Press F7
• Select modem type as User Port, and select 300 baud. You must do it in this order. If you select the baud rate first and then the modem type second the baud will change when the modem type is selected!
• Press Return to go back to terminal
• Press Return Again and you should see the Modem Info on the screen
• Hit F8 to go to Ascii mode
• Enter your ssid and password with the following terminal commands: at$ssid=ssid and at$pass=password (Your Password and SSID CAN NOT contain any special characters. For best resultsSSID and Password shouldonly use lower case letters and numbers.)
• F8 to go back to the Graphics terminal
• Type atc1 to connect. You may have to do this a few times to get it to connect
• Type the commands at&p0 then at&k1 . Without doing this 9600 baud will lock up your Commodore.
• Change the baud rate by typing at$sb=9600
• Press F7 Menu and select modem type as Up9600 Baud and then 9600 Baud
• Save your settings
• Press Return to go back to terminal. At this point if your terminal will not respond to any type of input, you will want to start all over. This time instead of changing the modem to up9600 and the baud to 9600, leave the modem type at userport and change the baud to 2400 and then continue. up9600 is a hack that tricks the userport into going 9600 baud and in my experience has issues on some machines, WHY? I could not tell you. Sometime if you repeat the setup steps several times the modem will allow 9600 baud.
• Type at&w to save the setting to the modem
*Typein the address of your favorite BBS and you are back in the 80's!
Setup
Related Items:
Commodore4ever Wifi Modem Commodore 64/128/Vic-20/Plus 4
$41.98
![]()
Documentation
- AIX Local Security Checks
- Backdoors
- CentOS Local Security Checks
- CGI abuses
- CISCO
- Databases
- Debian Local Security Checks
- Default Unix Accounts
- Denial of Service
- Fedora Local Security Checks
- Finger abuses
- Firewalls
- FreeBSD Local Security Checks